
Repoless stage and prod environments with AEM authoring as your content source
You may wish to set up a site for your production environment separate from your staging environment. Setting up a second site for a separate staging and production setup is similar to the setup required for multi site management. In fact, it can be combined with MSM site structures if required.
This document uses the typical example of separate staging and production environments. You can create separate environments for any environments you wish.
Requirements
To configure repoless stage and production environments, you must first complete the following tasks:
- This document assumes that you have already created a site for your project based on the Getting Started – Universal Editor Developer Tutorial
- You must have already enabled the repoless feature for your project.
Configuration
This document describes how to set up a separate production site for your project using the same code base. The following assumptions are made.
- The staging site is already set up and you now want to create a configuration for the production site.
- The content structure in AEM authoring is similar.
- The same path mappings will be used for staging and production.
In this example, we are assuming that a production site has already been created for the project called wknd whose GitHub repo is also called wknd.
There are two steps to configuring a separate production site.
- Create new Edge Delivery Services sites for your production environment.
- Update cloud configuration in AEM for your production site.
This document details these configuration steps.
Create New Edge Delivery Services Sites for Your Production Environment
- Retrieve your auth token and the technical account for your program.
- Please see the document Reusing Code Across Sites for details on how to obtain your access token and the technical account for your program.
- Create a new site by making the following call to the configuration service. Please consider:
- The project name in the POST URL must be the new site name you are creating. In this example, it is
website-prod. - The code configuration should be the same as you used for the initial project creation.
- The
content → source → urlmust be adapted to the name of the new site you are creating. In this example, it iswebsite-prod. - I.e., the site name in POST URL and the
content → source → urlmust be the same. - Adapt the admin block to define the users who should have full administrative access to the site.
- It is an array of email addresses.
- The wildcard
*can be used. - See the document Configuring Authentication for Authors for more information.
- The project name in the POST URL must be the new site name you are creating. In this example, it is
curl --request POST \
  --url https://admin.hlx.page/config/<your-github-org>/sites/website-prod.json \
  --header 'x-auth-token: <your-token>' \
  --header 'Content-Type: application/json' \
  --data '{
    "code": {
        "owner": "<your-github-org>",
        "repo": "website",
        "source": {
            "type": "github",
            "url": "https://github.com/<your-github-org>/website"
        }
    },
    "content": {
        "source": {
            "url": "https://author-p<programID>-e<environmentID>.adobeaemcloud.com/bin/franklin.delivery/<your-github-org>/website-prod/main",
            "type": "markup",
            "suffix": ".html"
        }
    },
    "access": {
        "admin": {
            "role": {
                "admin": [
                    "<email>@<domain>.<tld>"
                ],
                "config_admin": [
                    "<tech-account-id>@techacct.adobe.com"
                ]
            },
            "requireAuth": "auto"
        }
    }
}'
- Add the path mapping for your new site by making the following call to the configuration service.
curl --request POST \
  --url https://admin.hlx.page/config/<your-github-org>/sites/website-prod/public.json \
  --header 'x-auth-token: <your-token>' \
  --header 'Content-Type: application/json' \
  --data '{
    "paths": {
        "mappings": [
            "/content/website/:/"
        ],
        "includes": [
            "/content/website/"
        ]
    }
}'
Verify that the public configuration of your new site is working by calling https://main--website-prod--<your-github-org>.aem.page/config.json and verifying the content of the returned JSON.
Update Cloud Configurations in AEM for Your Production Site
Your production AEM must be configured to use the new Edge Delivery Sites you created in the previous section for a dedicated production site. In this example, content under /content/website on your production environment needs to know to use the website-prod site you created.
- Sign into the AEM production instance and go to Tools → Cloud Services → Edge Delivery Services Configuration.
- Select the configuration that was automatically created for your project.
- Tap or click Properties in the tool bar.
- In the Edge Delivery Services Configuration window:
- Provide your GitHub organization in the Organization field.
- Change the site name to the name of the site you created in the previous section. In this case, that would be
website-prod. - Change project type to aem.live with repoless config setup.
- Tap or click Save & Close.
Verify Your Setup
Now that you have made all of the necessary configuration changes, verify that everything is working as expected.
- Sign into your AEM production authoring instance.
- Navigate to the Sites console by going to Navigation → Sites.
- Select a page in your site.
- Tap or click Edit in the toolbar.
- Ensure that the page properly renders in the Universal Editor and uses the same code as your site root.
- Make a change to the page and re-publish.
- Visit your new Edge Delivery Services site for that page at
https://main--website-prod--<your-github-org>.aem.page.
If you see the changes that you made, your separate production site setup is working properly.
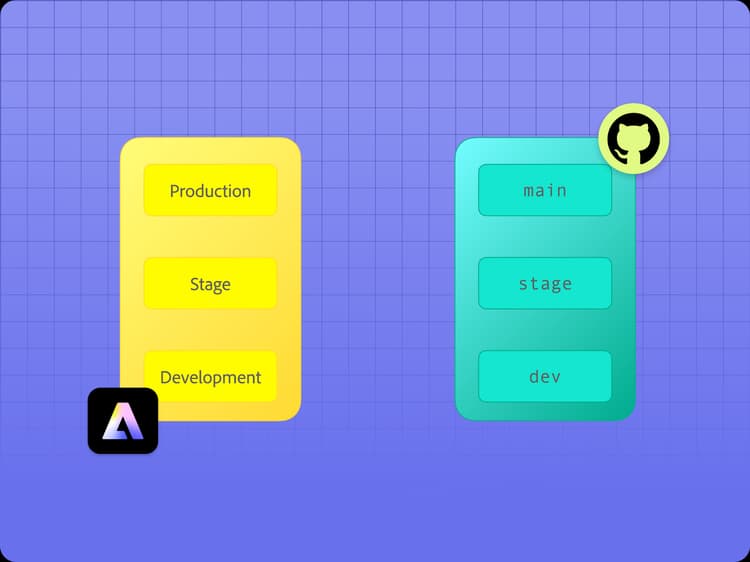
Usage
Once you have configured your project with repoless staging and production environments, you can manage code for them independently. The following diagram illustrates the relationship of the content in your various environments in AEM, Edge Delivery Services sites, and your GitHub repositories.
https://www.aem.live/developer/repoless-environments.svg
Note: While AEM Cloud Services provides all customers with Production, Stage and Development environments, Edge Delivery Services typically does not need all of these. Although setting these up using the repo-less approach is easy, this incurs the additional cost of extra tasks such as content sync and managing separate user access.
Consider using Staging and Development environments if you have use cases for them, such as having a dedicated environment for user acceptance tests.